

In Part 2 you learned what tokens, the context window, temperature and embeddings are. Now you use a model from real Java code.
By the end you will have a Spring Boot app with one endpoint, /ask. You send it a question. It passes the question to a model and returns the answer. You will also log how many tokens each call used, and make the app fail politely when the model is down.
Plan for 30 to 40 minutes. You need Java 17 or newer, Maven, an editor, and either Ollama (a free tool that runs models on your own machine) or an account with a hosted model provider.
Pick where the model runs
You have two choices. Both work. The code is the same either way.
| Local with Ollama | Hosted provider | |
|---|---|---|
| Account or key | None | Account and API key |
| Cost | Free to call, uses your computer | Pay per token, so check the provider's pricing page |
| Privacy | Prompts stay on your machine | Prompts go to the provider, so read its data policy |
| Speed | Depends on your hardware | Usually fast |
| Setup | Install Ollama, download a model | Create a key |
| Best for | Learning and offline work | Quality and speed in real apps |
We use Ollama here because it needs no account. Moving to a hosted provider later means changing one dependency and two properties. Your Java code stays the same.
Set up Ollama
Install Ollama from its official site. Then download a model and check that it is there:
ollama pull <model-name>
ollama list
Pick a small, general-purpose chat model that fits in your computer's memory. Model names and sizes change often, so we do not name one here. Browse Ollama's model library and choose one. Remember the exact name that ollama list prints. You need it in a minute.
Create the project
Open start.spring.io and choose:
- Project: Maven
- Language: Java
- Spring Boot: the current stable 4.x release (not a snapshot or milestone)
- Dependencies: Spring Web and Ollama (it sits under the AI group)
Generate the project, unzip it and open it in your editor.
Spring AI 2.0.x is built for Spring Boot 4.0 and 4.1. If your company is still on Spring Boot 3.5, use the Spring AI 1.1 line instead. Initializr picks the matching version for you, which is why we start there.
Your pom.xml should now contain something like this:
<dependencyManagement>
  <dependencies>
    <dependency>
      <groupId>org.springframework.ai</groupId>
      <artifactId>spring-ai-bom</artifactId>
      <version>${spring-ai.version}</version>
      <type>pom</type>
      <scope>import</scope>
    </dependency>
  </dependencies>
</dependencyManagement>

<dependencies>
  <dependency>
    <groupId>org.springframework.boot</groupId>
    <artifactId>spring-boot-starter-webmvc</artifactId>
  </dependency>
  <dependency>
    <groupId>org.springframework.ai</groupId>
    <artifactId>spring-ai-starter-model-ollama</artifactId>
  </dependency>
</dependencies>
The BOM (bill of materials) keeps all Spring AI modules on the same version, so you never set versions on the starters yourself. The starter spring-ai-starter-model-ollama creates the beans that talk to Ollama. Spring AI has one starter per provider, with the same naming pattern.
Tell Spring which model to use
Open src/main/resources/application.properties and add one line:
spring.ai.ollama.chat.options.model=<the-name-from-ollama-list>
Ollama runs on your machine at its default address. Spring AI uses that default too, so you do not need to set a URL.
Using a hosted provider instead
Replace the Ollama starter with the starter for your provider. The property for the key follows one pattern, spring.ai.<provider>.api-key. For example:
spring.ai.openai.api-key=${OPENAI_API_KEY}
spring.ai.anthropic.api-key=${ANTHROPIC_API_KEY}
Set the environment variable in your shell or in your IDE's run configuration. Never write the key into a file you commit. Check the reference for your provider's exact starter name, because some providers changed theirs in Spring AI 2.0.
Write the endpoint
Create a class called AskController:
package com.example.assistant;

import org.springframework.ai.chat.client.ChatClient;
import org.springframework.web.bind.annotation.GetMapping;
import org.springframework.web.bind.annotation.RequestParam;
import org.springframework.web.bind.annotation.RestController;

@RestController
class AskController {

    private final ChatClient chat;

    AskController(ChatClient.Builder builder) {
        this.chat = builder
                .defaultSystem("You are a helpful assistant for Java developers. Keep answers short.")
                .build();
    }

    @GetMapping("/ask")
    String ask(@RequestParam String q) {
        return chat.prompt().user(q).call().content();
    }
}
That is the whole feature. Four things to notice:
- Spring Boot gives you a
ChatClient.Builderbean. You build the client once in the constructor and reuse it. defaultSystemsets the instructions the model gets on every call.prompt().user(q)adds the question.call().content()sends the request and returns the answer as aString.
Start the app and ask something:
./mvnw spring-boot:run
In a second terminal:
curl --get --data-urlencode "q=What is a Java record?" http://localhost:8080/ask
You should get a short plain-text answer. Ask the same question twice. The wording will differ. That is temperature and sampling at work, from Part 2.
What just happened
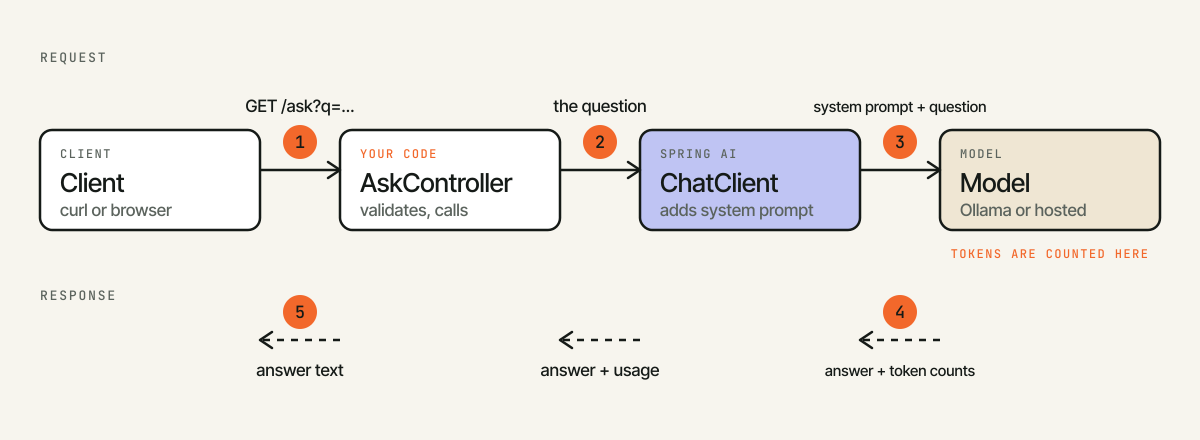
Figure 1. One call, step by step. Your code owns steps 2 and 5. Spring AI owns step 3. The model owns step 4.
- The client sends
GET /ask?q=.... - Your controller hands the question to
ChatClient. ChatClientbuilds the request from your system prompt and the question, and sends it to the model.- The model writes an answer and reports how many tokens it read and wrote.
- You return the text.
Nothing is remembered between two calls. The model only sees what you send each time, like a stateless HTTP request. If you want a conversation, you must send the history yourself, or use a feature that does it for you. We cover that later in the series.
Give the system prompt a job
A system prompt is where you set the role, the limits and the format. Try a stricter one:
.defaultSystem("""
    You answer questions about Java and Spring only.
    If a question is about anything else, say you can only help with Java and Spring.
    Keep answers under 120 words.
    """)
Restart the app. Ask a Java question. Then ask something off topic, like a recipe. Most models follow instructions like this. Some do not, especially small ones. Test it with your model and see.
One rule matters more than any other here. Keep the user's text out of the system prompt. Put instructions in the system prompt, and put the user's words in the user message. That separation does not make you safe from prompt injection by itself, but mixing them makes things worse.
See what each call costs
Tokens are what models count. Both your prompt and the answer use tokens. Let us log both.
Move the call into a small service. This also makes the code easier to test later:
package com.example.assistant;

import org.slf4j.Logger;
import org.slf4j.LoggerFactory;
import org.springframework.ai.chat.client.ChatClient;
import org.springframework.ai.chat.model.ChatResponse;
import org.springframework.stereotype.Service;

interface Assistant {
    String ask(String question);
}

@Service
class ChatAssistant implements Assistant {

    private static final Logger log = LoggerFactory.getLogger(ChatAssistant.class);

    private final ChatClient chat;

    ChatAssistant(ChatClient.Builder builder) {
        this.chat = builder
                .defaultSystem("You are a helpful assistant for Java developers. Keep answers short.")
                .build();
    }

    @Override
    public String ask(String question) {
        ChatResponse response = chat.prompt().user(question).call().chatResponse();

        var usage = response.getMetadata().getUsage();
        if (usage != null) {
            log.info("tokens: prompt={}, completion={}, total={}",
                    usage.getPromptTokens(), usage.getCompletionTokens(), usage.getTotalTokens());
        }
        return response.getResult().getOutput().getText();
    }
}
chatResponse() returns the full response, not only the text. The usage numbers sit in its metadata. When a call involves several model calls, such as a tool loop, the usage is the total across all of them.
Some providers may report no usage, or zeros. If you see that, check your provider's page in the reference.
On a local model, the cost is time and memory. On a hosted model, tokens are your bill. That log line is your first cost monitor. Keep it.
Make it fail safely
Models are slow and sometimes unavailable. Your endpoint should behave well when that happens. Update the controller to use the service, check the input, and turn failures into a clean error:
package com.example.assistant;

import org.slf4j.Logger;
import org.slf4j.LoggerFactory;
import org.springframework.http.HttpStatus;
import org.springframework.web.bind.annotation.GetMapping;
import org.springframework.web.bind.annotation.RequestParam;
import org.springframework.web.bind.annotation.RestController;
import org.springframework.web.server.ResponseStatusException;

@RestController
class AskController {

    private static final Logger log = LoggerFactory.getLogger(AskController.class);
    private static final int MAX_QUESTION_LENGTH = 2000;

    private final Assistant assistant;

    AskController(Assistant assistant) {
        this.assistant = assistant;
    }

    @GetMapping("/ask")
    String ask(@RequestParam String q) {
        if (q == null || q.isBlank()) {
            throw new ResponseStatusException(HttpStatus.BAD_REQUEST, "Please ask a question.");
        }
        if (q.length() > MAX_QUESTION_LENGTH) {
            throw new ResponseStatusException(HttpStatus.BAD_REQUEST, "Question is too long.");
        }
        try {
            return assistant.ask(q);
        } catch (RuntimeException e) {
            log.warn("Model call failed: {}", e.toString());
            throw new ResponseStatusException(HttpStatus.SERVICE_UNAVAILABLE,
                    "The assistant is unavailable. Try again later.");
        }
    }
}
Three habits are in this code. Check the input before you spend tokens. Never send the raw exception to the caller. Log enough to debug it later.
One more thing the code does not show: set a timeout on the HTTP client. A call that never returns holds a thread. The exact setting depends on the starter you use, so look it up on its page in the reference.
When something goes wrong
| What you see | Likely cause | What to check |
|---|---|---|
| Connection refused | Ollama is not running | Start Ollama and try again |
| Model not found | The name in your properties does not match | Compare with ollama list, or pull the model |
| 401 or 403 from a hosted provider | Missing or wrong key | Is the environment variable set in the same terminal or IDE that runs the app? |
| Very slow first answer | The model is loading into memory | Wait, or try a smaller model |
| Out-of-memory error on a local model | The model is too big for your machine | Use a smaller one |
| Vague or odd answers | Vague prompt, or a model that is too small | Tighten the system prompt, or try another model |
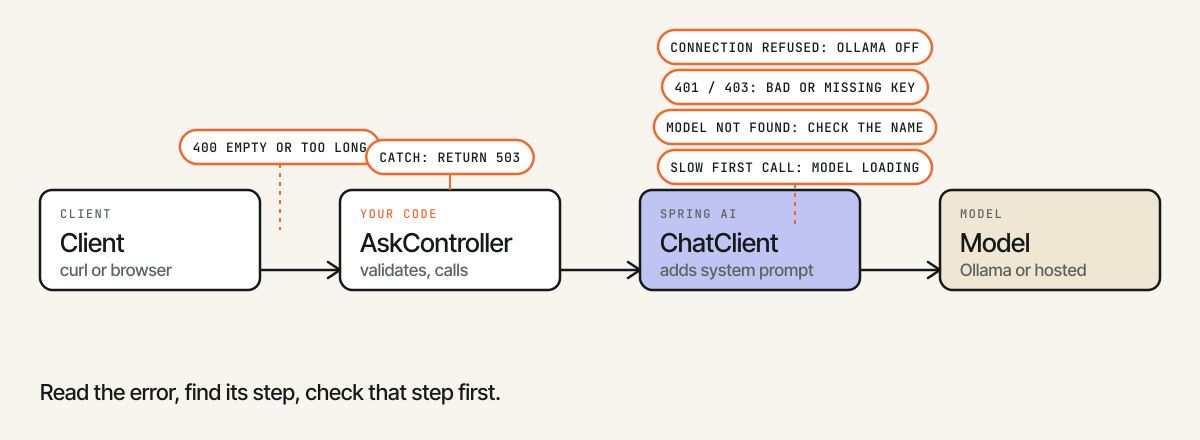
Figure 2. Where each common failure comes from. Start at the step that matches your error.
Keep it testable
You split the code into a controller and an Assistant interface for a reason. In a test, you can give the controller a fake Assistant that returns a fixed string. Then you test your validation and your error handling without calling a model. Tests that call a real model are slow, cost money on hosted providers, and give different answers every time. Save those for the evaluation work later in the series.
Five mistakes to avoid
- Putting a key in Git. Use environment variables or a secrets manager. If a key ever lands in a commit, treat it as leaked and replace it.
- Mixing user text into the system prompt. Keep instructions and user input separate.
- No limit on input size. Long inputs cost more and run slower. Set a maximum, as above.
- Trusting the output. The model's text is untrusted content. If you show it in a web page, escape it like any other user input.
- Calling the model inside a database transaction. A slow call will hold your database connection the whole time. Call the model first, then open the transaction.
Cheat sheet
| Task | What to use |
|---|---|
| Add Spring AI | Import spring-ai-bom, add one spring-ai-starter-model-* starter |
| Choose a model | A property such as spring.ai.ollama.chat.options.model |
| Hosted key | spring.ai.<provider>.api-key=${ENV_VAR} |
| Get a client | Inject ChatClient.Builder, call build() once |
| Set instructions | defaultSystem(...) |
| Ask a question | chat.prompt().user(q).call().content() |
| Read token usage | .call().chatResponse(), then getMetadata().getUsage() |
| Fail safely | Validate input, catch failures, return 503 |
Try it yourself
- Change the role. Make the system prompt say the assistant must answer in exactly three bullet points. Ask five different questions. How many answers follow the rule? A good result is a number you can write down.
- Measure tokens. Ask three questions of different lengths and note the prompt and completion tokens from the log. Which grows faster, the prompt or the answer?
- Swap the provider. If you have a hosted account, change the starter and the properties. Leave
AskControllerandChatAssistantuntouched. If you did it right, nothing else changes.
What comes next
In Part 4 we ask the model for a Java record instead of plain text, and we stream the answer word by word. The series runs from today's first call to evaluation and production.
If you want the next part when it is out, follow the blog's RSS feed, or follow us on X and Instagram.